Recommended Action Check that WinRM is installed and running on server ‘server.domain.com’. For more information use the command “winrm helpmsg hresult” and http://support.microsoft.com/kb/2742275.
After a quick Google search, I found an older article, referring to a smiliar error in SCVMM 2008 :
This can occur if the WinRM setting “MaxEnvelopeSizekb” is mismatched between the System Center Virtual Machine Manager server and the host.
I checked MaxEnvelopeSizeKB on Hyper-V Host, SCVMM management server and SCVMM Library Server by running:
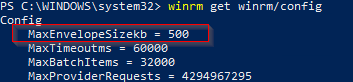
winrm get winrm/config
It turned out that MaxEnvelopeSizekb was set to 500KB on the SCVMM management server:
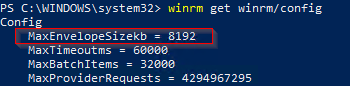
Comparing MaxEnvelopeSizekb value on other SCVMM Fabric server, I found out that the SCVMM default size should be set to 8192KB.
By executing the command below, I changed back MaxEnvelopeSizekb to 8192KB:
winrm set winrm/config @{MaxEnvelopeSizekb="8192"}
After rebooting SCVMM management node, template creation is working again.
What happened?
After SCVMM 2022 upgrade, I also did an inplace-upgrade of the SCVMM management server from WS2019 to WS2022. It seems like the inplace-upgrade reset MaxEnvelopeSizekb.
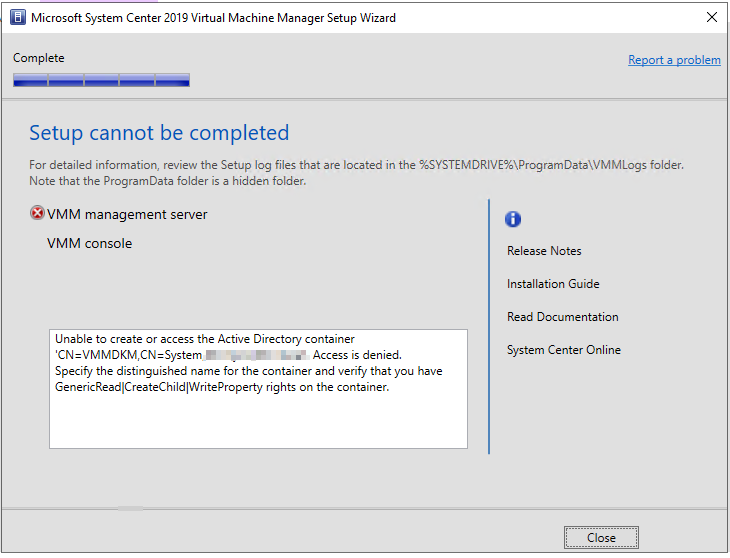
A common error message one can get during SCVMM setup is:
Unable to create or access the Active Directory container ‘CN=VMMDKM,CN=System,DC=domain,DC=local’. Access is denied. Specify the distinguished name for the container and verify that you have GenericRead|CreateChild|WriteProperty rights on the container.
Well, it took me some time to find the root cause. And as this happened twice in the last few months, I decided to write it down and share it with you.
So in my case, I have a highly available setup containing of 2 SCVMM nodes. The environment was initially setup with SCVMM 2016 and a legacy service account (username & password). During the upgrade from 2016 to 2019 I wanted to replace the existing service account with a gMSA account, which is supported in SCVMM 2019.
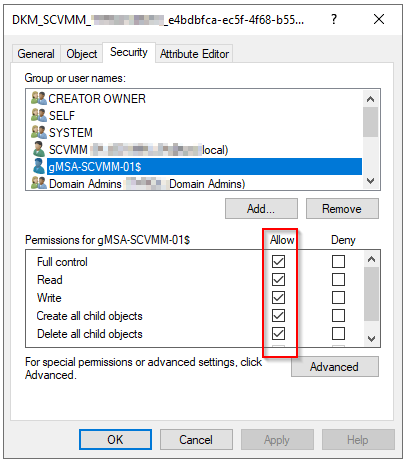
So first I double-checked permissions on the DKM container in Active Directory. Both SCVMM Service Accounts (gMSA for VMM Service and legacy service account for database connection in my case) have full control permissions on the container and also on the objects itself. But still the setup failed with error message “Access is denied”.
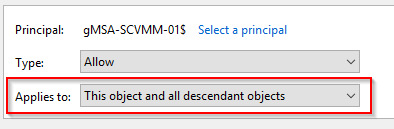
Applies to “This object and all descendant objects” should be selected.
I also checked that inheritance is set to ‘This object and all descendant objects’, but still I got an access denied error. VMM Setup log under C:\ProgramData\VMMLogs also wasn’t helpful at all.
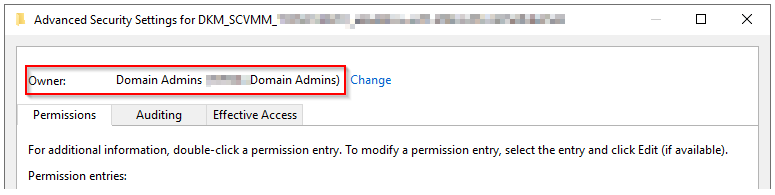
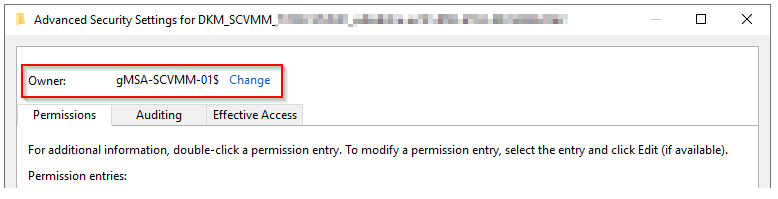
After some time I realized, that Domain Admins group was set as an owner on the DKM container. After replacing it with the actual service account (the gMSA one…), the setup succeeded without an error. Please make sure to replace the owner on all descendant objects as well!
Accidentally ‘Domain Admins’ group was set as an ownerReplace owner information with actual service account
Conclusion
When facing DKM access denied issues during SCVMM setup, please make sure, that:
new SCVMM service account has full controll on DKM container and on all descendant objects
new SCVMM service account is Owner of the DKM container and its descendant objects
I hope this information is useful and safes some time during your next SCVMM setup 🙂
If you have a Synology NAS in your environment (like me in my home lab) and it’s connected to SCVMM via SMI-S, you may have already faced the issue that storage discovery doesn’t work when NAS is running DSM 6.1. Although status is “Responding”, you can’t see any capacity information in SCVMM console:
Luckily there’s a fix available for that. Synology just released an update for its SMI-S Provider plugin (version 1.0.1-0020) which fixes exactly this issue.
After updating the plugin on my Synology box, I just ran a rescan via the SCVMM console and now all storage information is available via SCVMM again:
This article shows how to disable NetBIOS and LMHOSTS look up via PowerShell and via a SCCM Configuration Baseline
There are lots of reasons why you should disable NetBIOS and LMHOSTS lookup. Both from performance and from security perspective. I don’t want to go into detail here, you can find tons of articles about that topic in the Internet. In this article, I want to quickly demonstrate how NetBIOS and LMHOSTS look up can be disabled by using PowerShell and via SCCM Configuration Baseline with automatic remediation.
Let’s start with PowerShell… Ok, it’s actually not only PowerShell, we also need a bit of WMI. Run the following script in an evelated PowerShell window on the host where you want to disable NetBIOS and LMHOSTS look up. It should basically work with every PowerShell version. (This script disables NetBIOS and LMHOSTS look up on all NICs)
$NICS = Get-WmiObject win32_NetworkAdapterConfiguration
foreach ($NIC in $NICS){
        $NIC.settcpipnetbios(2) # 2 = disable netbios on interface
        $NIC.enablewins($false,$false)
    }
Line 3 disables NetBIOS on the specified NIC. For reference, see 1
Line 4 disables LMHOSTS look up. For reference, see 2
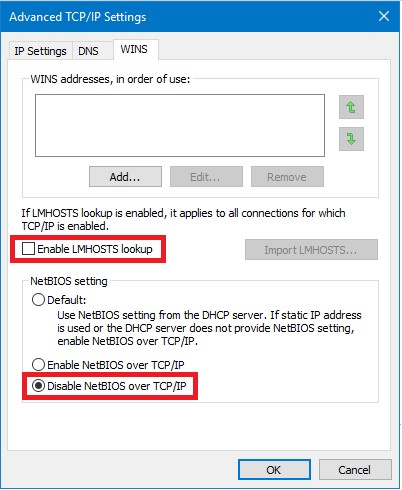
To verify this on your server or workstation, go to Control Panel -> Network and Sharing Center -> Change Adapter Settings. Right click on the Ethernet adapter, Properties -> Internet Protocol Version 4 (TCP/IPv4) -> Properties -> Advanced… -> WINS. It should look like this now:
Ok, so this script disables NetBIOS and LMHOSTS look up on all currently available NICs in the server/workstation. But what, if you add an external USB NIC? Or if you replace the NIC? Or – in a VM – add a second NIC? In certain scenarios you need to run this script again, because of recent hardware changes. This is the point, where SCCM kicks in with its Configuration Baselines.
A Configuration Baseline in SCCM basically is a desired state configuration. It can not only monitor settings, it also can remediate settings. A few months ago I created a Configuration Baseline for SCCM, which can monitor and remediate NetBIOS and LMHOSTS look up settings on every Windows Server or Workstation which runs a recent version of PowerShell.
Configuration baselines in SCCM can be a bit hard to understand, if it’s the first time you want to create one. You can download my Configuration Baseline below, and import it to your SCCM.
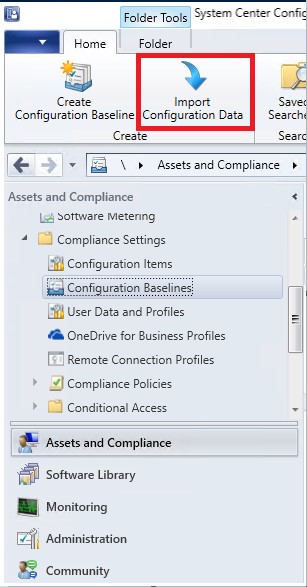
To import this baseline, open SCCM console and navigate to Assets and Compliance -> Compliance Settings -> Configuration Baselines. Then, go to Import Configuration Data.
Import Configuration Baseline in SCCM
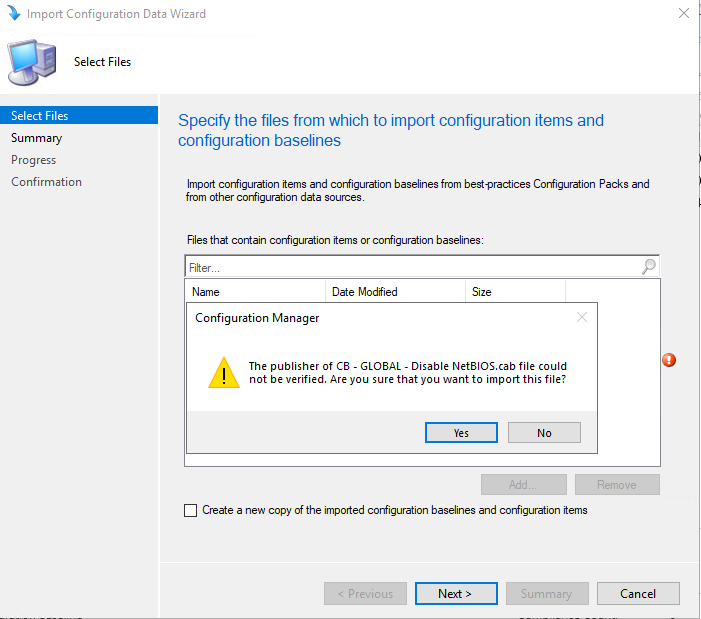
On the import wizard, click Add… and point to the previously downloaded .cab file. You will receive a warning, that the publisher could not be verified. This is normal as I haven’t signed it. If you don’t trust me, you can find the necessary scripts on the end of the article 😉
Security Warning when importing SCCM configuration baseline
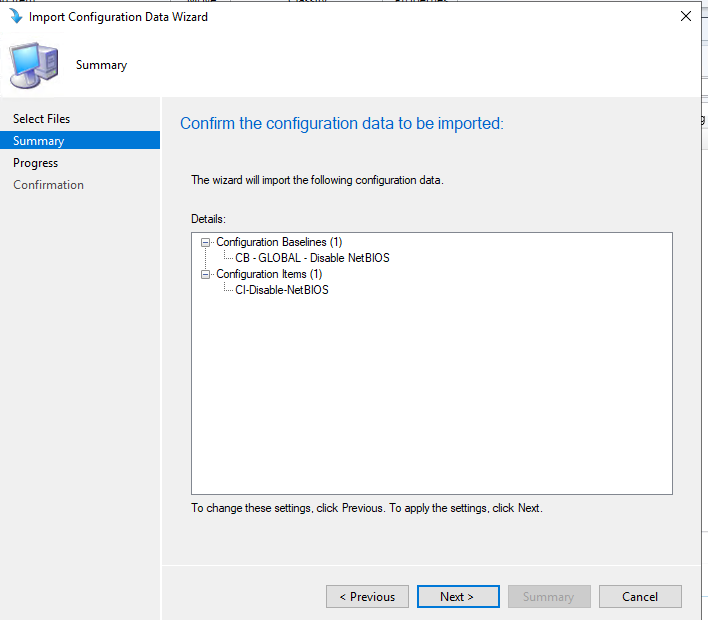
On the next page, you see what items will be imported:
Configuration baseline import wizard
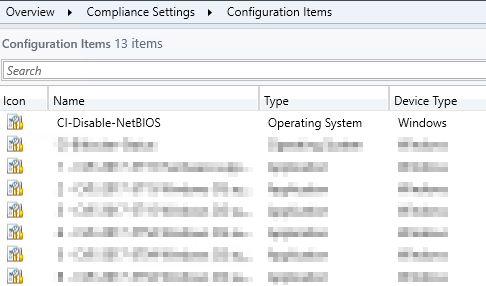
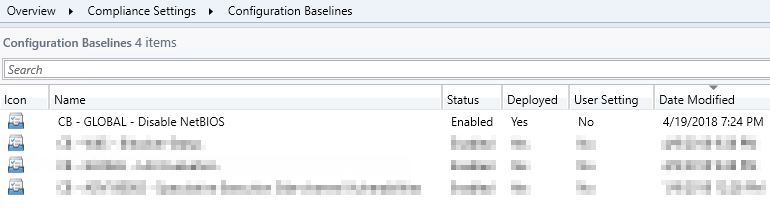
You should have a new Configuration Item (CI – Disable NetBIOS) and a new Configuration Baseline (CB – Global – Disable NetBIOS) in SCCM now:
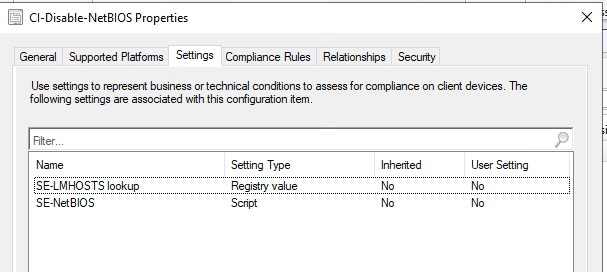
The magic happens inside the Configuration Item (CI – Disable NetBIOS). It consists of 2 settings. One checks a specific registry key to see if LMHOSTS look up is enabled or not. The other one is a short PowerShell script to check NetBIOS state.
The first one is named SE-LMHOSTS lookup and will be described below:
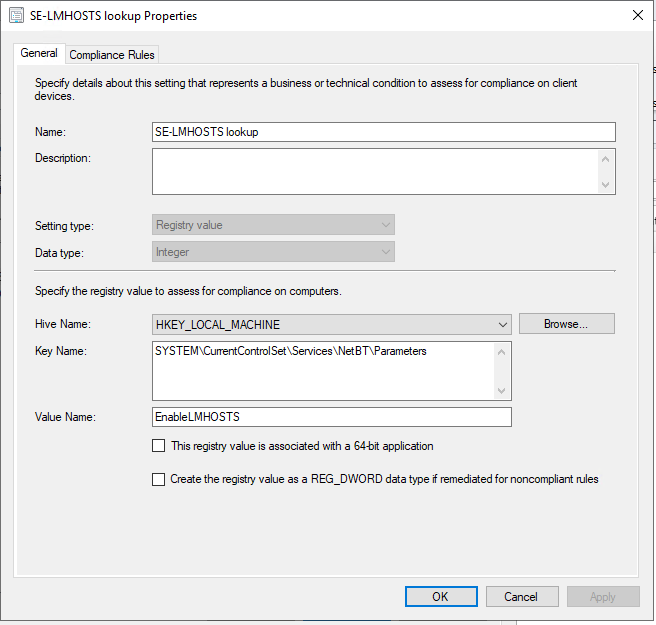
SE – LMHOSTS look up settings This setting monitors the registry value EnableLMHOSTS under Computer\HKEY_LOCAL_MACHINE\SYSTEM\CurrentControlSet\Services\NetBT\Parameters. If LMHOSTS look up is disabled, value should be 0.
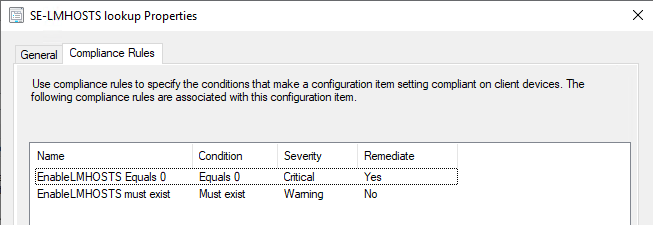
LMHOSTS registry keyCompliance Rules for LMHOSTS lookup CI setting
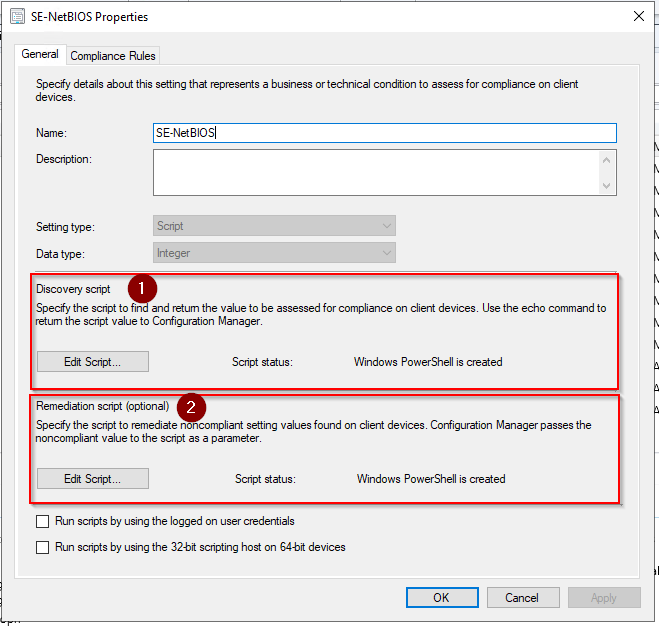
The second one is SE-NetBIOS and consists of 2 scripts. (1) Discovery Script, (2) Remediation script. You can find both scripts below.
SE-NetBIOS discovery and remediation script settings
1. SE-NetBIOS discovery script To verify if NetBIOS is enabled on a NIC, we need a few lines of PowerShell. Since servers or workstations can have multiple NICs, we need to query the registry for all existing adapters:
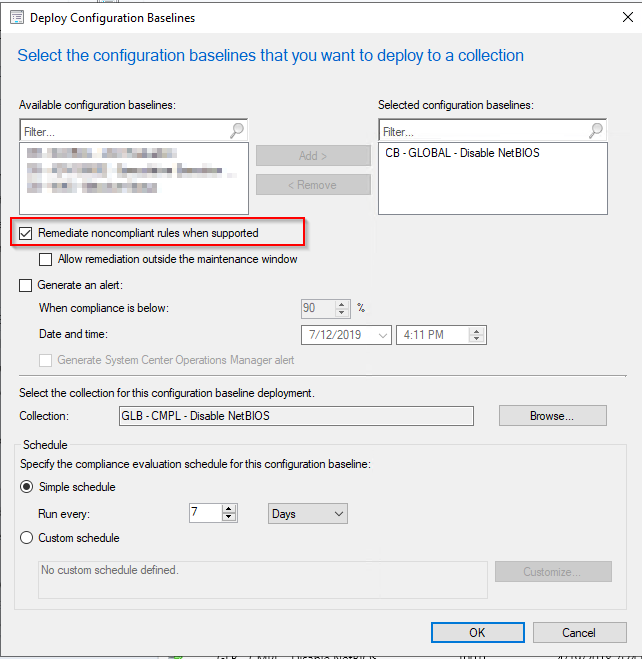
That’s it, basically. If you have imported my Configuration Baseline, you can deploy it to a test collection now. If you want to remediate the settings, don’t forget to enable Remediate noncompliant rules when supported setting:
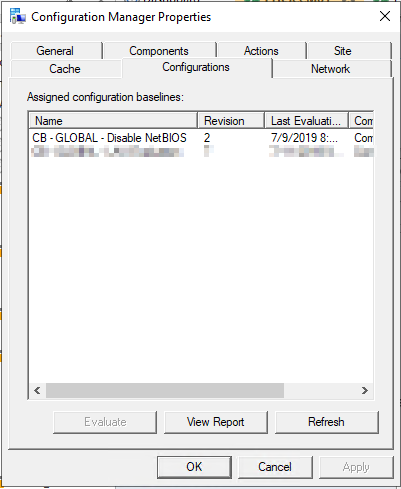
On next Machine Policy refresh cycle you will find the new baseline in SCCM agent under Configurations:
SCCM agent Configurations tab
Based on the deployment, it may take a while that SCCM automatically evaluates the baseline. To speed up the process, you can also hit Evaluate and check the report.
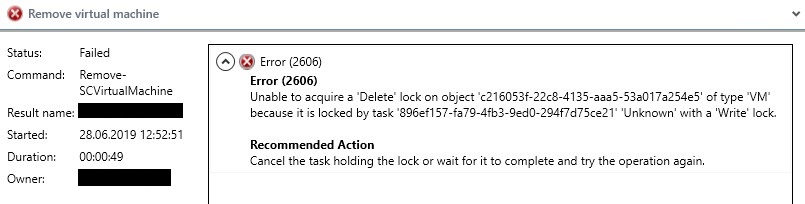
If you are administering System Center Virtual Machine Manager (SCVMM) you probably came to that point, that you received the following error message below as a job result:
"Unable to acquire a 'Delete' lock on object 'c216053f-22c8-4135-aaa5-53a017a254e5' of type 'VM' because it is locked by task '896ef157-fa79-4fb3-9ed0-294f7d75ce21' 'Unknown' with a 'Write' lock."
SCVMM error message
Normally, SCVMM automatically resolves a write lock. But in some cases, the write lock can’t be removed. In this case, the only way to remove the write lock is to manually delete it from the database.
!!! Please make sure you back up SCVMM database first !!!
Open SQL Management studio and connect to SCVMM database. Run the following query to double-check the write lock: (replace TaskID with the ID in your error message!)
select * from tbl_VMM_Lock where TaskID = '896ef157-fa79-4fb3-9ed0-294f7d75ce21'
If this query returns an output, you can run the following query below to manually remove the write lock: (replace TaskID with the ID in your error message!)
In my case, one VM was in state “Under Migration” although migration already has been finished. A manual failover to another Hyper-V host within the cluster didn’t refresh the state in SCVMM. After manually deleting the write lock, SCVMM was able the refresh the VM state again.